Showing posts with label sewing class. Show all posts

Tuesday, June 16, 2009

Sewing Classes!

I've just solidified my Summer sewing class schedule so if you are or know of a Dallas-area beginner or advanced beginner looking for lessons, I've gotcha covered. :)

Classes are $125 for all 6 hours of instruction while micro-classes will be $45. Full-time students get a sympathy discount. :) All classes are held at my apartment (low overhead cost!) near Baylor hospital. Precise directions along with class materials list will be sent out after registering for a class as I'm not so keen on posting my home address online for any to see. Just in case.

If you're interested email me at alicia.marshevans AT gmail.com (replacing "at" with "@" - doing it this way snags up the spambots) and I'll get you signed up!

You should have your own machine though I do have a couple class machines if you need one, whether because yours is too heavy to bring in or you want to take this with your child/parent/spouse/roommate/etc and you only have one between your or whatever. Just know that all classes past 101 have homework and you will need a machine for it!

Classes

101- Learning to Love Your Machine
For beginnings. Learn the basics of threading, tension, and sewing through making a number of small projects.

Session 1 - Mondays, 7-8:30pm, June 22-July13th (4 sessions)
Session 2 - Saturday 10am-1pm, June 27, July 11 (2 sessions)

201 - First Pattern (Apron)
Learn to read a commercial pattern while making a beautiful and practical apron. Cutting and marking will be covered.

Session 1 - Tuesdays/Thursdays, 7pm-8:30, June 30, July 2, 7, and 9th.
Session 2 - Saturdays, 2-5pm, June 27 and July 11

202 - Perfect Fit Pencil Skirt
Learn to fit and sew a pencil skirt that's perfect for your figure. Darts, zippers, facings, and basic drafting will be covered.

Session 1 - Tuesdays/Thursdays, 1pm-2:30pm, June 30, July 2, 7, and 9th.
Session 2 - Wednesday/Fridays 7pm-8:30pm, June 24, 26, July 1, 3rd.

-----
In addition I have some elective classes and micro classes (one session classes) that I'd like to do, if there's interest. Please note if one of these sounds good and if there's a general time that works best for you!

Possible "elective" classes (all need 101 experience - 102 very helpful but not necessary)

Full Classes (meet 4 times over two or four weeks)
- Sewing a maternity skirt (emphasis on making one pattern up in different ways)/maternity wardrobe (top and skirt)
- Sewing a camp shirt (buttonholes, collars)
- Little Black Dress

Microclasses (Meet just 1 time)
- Next Step Techniques - setting in sleeves, darts, zippers, and different hems
- Mending
- Fabrics - different properties, choosing the right one for a project, intro to knits, etc.
- Sew a Knit Top - it's really easier than you think!

Friday, November 14, 2008

Belated rejoicing

So this is a bit overdue but thought I'd share my happiness at how well both my intro to sewing class and my free-style sewing nights are going.

Last intro class we worked on making seams and figuring out where the seam guides were on the machine plates. In a previous class with a couple careful crafters this one bit took most of the time. This time, with more experienced and adventurous students that took up ... five minutes. Maybe less. Fortunately that left extra time for picking fabrics for the little bags we made, reviewing pin safety and working with machine quirks (like thread-eating at the beginning of seams - greedy machine!), and even sewing a basic machine hem. And we had a lot of fun doing it! I love making little cloth bags since they're SO easy and yet look so posh and impressive. Students seem to love them just as much so it's a great second-class project. Build confidence, build skills!

Also last Friday I opened my apartment for what I'm calling a "Free Style Friday Sewing Night" (better name when one shows up) where, in theory, anyone who wants to come over and sew or embroider or knit or crochet or anything else fiber related can. I set up a cutting table, put out snacks, and part way through have a little demo or whatnot. At least that's the theory. The first night I had two experienced seamstresses who wanted to cut, sew, and chat and we wound up skipping the demo. That turned out to be for the best because THIS time I had two utter newbies who didn't really have anything to work on and so I pulled out the demo and showed them how to form the two most basic embroidery stitches, running and back stitch, to make embroidered coasters.

It was fabulous.

Attendee #1 is a tween who lives in the building and is in the difficult position of being the oldest kid in the building and sharing a bedroom and tiny apartment with two younger sisters. She's a fantastic young lady and I hope giving her individual time and a skill all her own helps her during what can't be a very fun period of life. I'm probably projecting since at that age we moved to a one-bedroom apartment and I shared a living room with my brother. Who was going through a Barney phase. I had the space under the side table as "my" room. I think I'm still traumatized. So, while trying to not shove all my childhood PTSD on her I do really enjoy the chance to spend time with her and give her a quieter place to spend some time. She'll be taking sewing lessons soon so expect to hear more! She sewed a very good first-time snowflake and the next day dropped by to show me her two newest creations. I wish I'd gotten pictures because she's got some serious talent.

The other drop-by had just come from Joann's to get material to make a pillow for her grandmother and wanted to embroider a monogram. Great timing! She's so encouraging, after I showed her the steps and she practiced for a bit she did a sample letter and was just so excited that it just made the whole night feel like a success. I saw her husband today and apparently she's telling everyone about her new l33t skillz and how they've changed her life. I didn't realize embroidery was so powerful but, hey, not going to argue! So it's been a good, warm-fuzzy time in the sewing studio. And smelly. I made up some aromatherapy heat bags yesterday and I think I overdid it on the essential oil. I just added 10 drops to the bag of rice, just like some suggestion somewhere said ... or so I thought. I think I'll go with two, maybe three drops next time. Until then, anyone have any tips on de-scenting some already sewn up bags? :)

Monday, July 14, 2008

Second class report

Our second class (with two students! yay!) went really well. I need to figure out a better way to do demonstrations in my cramped little living room but overall it was mostly practicing anyway. We learned how to stitch a straight seam using papers with lines on them either 1/4", 1/2", or 5/8" in. By putting the line side down you can sew up the paper and then turn it over to check how you did. It helped me discover that my little Bernedette doesn't actually have a 5/8" line on it's little metric plate. So not exactly sure what size seams I've been sewing on it. Oops! I need to put down some masking tape and make my own lines. Once I get around to getting masking tape. It's the little things that hold me up.

After working for a while on just sewing up those strips (the time flies!) I showed them the three most basic ways to start and stop seams (tying off, backstitching, and securing with tiny stitches) and was moderately gratified that both gravitated towards the tiny stitches method. It's my personal favorite, brought about from years of sewing with a machine that hates going backwards, so I felt extra good passing on that bit. After all, most places tell you to backstitch. This is like secret sewing wisdom and I get to bestow it upon my apprentices. Or something like that. Anyway, I enjoyed it. In the last bit of class we put our new knowledge to use making cute little bags and I showed them a few variants. One of my students is a total perfectionist while the others' a bit more of a DIYer and I think both really learned from making those silly, easy little bags. My perfectionist (or Debbie, named after a friend who's a perfectionist) was thrilled to finish something and liked realizing that whatever she did and whatever seam width or stitch she used, it would still be a great little bag and my DIYer liked the guidance and the fun of having one project she knows she can churn out again with confidence. Success!

It was funny that at 40 minutes into the 90 minute lesson I was getting antsy and wanted to move on, do more, teach more, cram in all the stuff I'd had planned and instead we were still working with sewing seams. And then one of the students said "you know, we've been sewing for just 40 minutes and it's amazing - I already feel so much more confident with my machine!" It really helped me to hear that - to remind myself that the goal isn't to give them a fly-over of sewing techniques (though the basics are highly helpful) but instead to get them to love and be comfortable with their machines so that when they learn the techniques they can do them without being intimidated by that scary needle or the noises or sudden movement. It's the same process I used to teach my brother to drive and, you know, he's still driving regularly and has a perfect record, despite the crazy area he lives in. So I guess my teaching method works, at least for some learners!

Both students were asking about our next class so I haven't scared them off! Highly encouraging. :) I had to get my eyes tested today and the dilation lead to a migraine so I'm sitting in a dark corner nursing it before crawling to bed. That's my excuse for not uploading pictures of the bags we made. I promise to do it soon, they really turned out nice!

Thursday, July 10, 2008

Sewing 101 - Lesson 1: Sewing along lines

Lesson 1 - Sewing straight lines


Lesson 1 - Pivoting while sewing


Lesson 1 - Sewing along curves

Sewing 101 - Machine Basics 1

Machine Basics 1 - Identifying some key parts of the machine


Machine Basics 1, extended edition - Identifying some key parts on other machines

Sewing 101 - Introduction Video

Introduction to our first lesson
Unfortunately my little camera's been having trouble with it's shutter - specifically, it only opens a crack without some encouragement. I filmed and refilmed this intro section four or five times and FINALLY got it right - only to realize that I'd forgotten to give the little shutters the nudge they need to open. So for all intents and purposes this intro is all audio, no video. That's not as bad as it sounds since, really, it's just me talking. Imagine me sitting somewhere (I vote for a nice tropical island or perhaps a luxury home in the mountains of California) and that'll take care of the visuals until I get over my disappointment enough to refilm this.

Wednesday, July 09, 2008

More videos!

Another couple videos - these were filmed yesterday but took FOREVER to format and upload. Well, ok, 24 hours isn't forever. But it feels like it when dealing with computers. :)

Machine Basics 1 - Identifying some key parts of the machine


Machine Basics 1, extended edition - Identifying some key parts on other machines

Tuesday, July 08, 2008

Beginning sewing video tutorials

I made up these videos in part because I could. I recently discovered the movie function on my little camera and, well, wanted to see what I could do with it. Anyway, since I'm proud of the videos I'm posting them here for others to marvel at - or at least watch if interested. :)

The three lesson videos cover the very very basics of sewing - straight lines, pivoting, and sewing along curves. In class these lessons came after a basic intro to the machine and I'd like to film that as well but then my memory card filled up and ever since I've been working on getting these videos converted, edited, and posted. To film I got both of my machines involved. My new Bernedette 55 got the spotlight (this time!) while I found that my old Viking worked fantastic as the tripod. It has two spool pegs on the back that help hold the camera at just the right angle to film. So file that under 101 alternative uses of the machine - as a tripod for a sewing show. :)

By the way, it's not easy to sew when there's a whole extra machine between you and your work. It's working for these intro sections but I might need to get a real and less obtrusive tripod and better camera before trying to sew zippers on film!

Back to the intro videos, here they are!

----

Introduction to our first lesson
Unfortunately my little camera's been having trouble with it's shutter - specifically, it only opens a crack without some encouragement. I filmed and refilmed this intro section four or five times and FINALLY got it right - only to realize that I'd forgotten to give the little shutters the nudge they need to open. So for all intents and purposes this intro is all audio, no video. That's not as bad as it sounds since, really, it's just me talking. Imagine me sitting somewhere (I vote for a nice tropical island or perhaps a luxury home in the mountains of California) and that'll take care of the visuals until I get over my disappointment enough to refilm this.


Lesson 1 - Sewing straight lines


Lesson 1 - Pivoting while sewing


Lesson 1 - Sewing along curves

Monday, July 07, 2008

First class report

First class went well! We were scheduled to have a grand total of two students (with a third joining in a few weeks) but before the class got started one called and, I think, told me she'd have to skip due to a sick baby and no sleep the past four days. It was hard to tell over the very angry, very hurt screaming of the poor little kid. I feel for both of them - it stinks to be sick and it stinks even more to be the one caring for the sick person, especially when they're so little. So we had a very personal class for my one student. :)

On the good side, I found that I'd erred on the side of preparing too much rather than too little. We spent a lot of time just sewing on lines on paper, getting used to controlling the paper, the different stitch lengths, speed control, and all that. My student's the total opposite of me insofar as sewing goes - she wanted to make sure she had each step down pat before moving on. Me? I skipped any sort of training and went straight for the fabric. Nice fabric. Nice, slippery, shiny, polyester fabric. So it was a great learning experience to teach someone so different. She seemed to enjoy it and said she felt like she learned a little more about her machine and is gaining confidence. Since we only had 90 minutes, that's pretty good! Plus she's coming back next week so that's encouraging. :) Looks like I'll be learning how to catch up one student while teaching the other. Ideally I'd just tell student #2 to sign up for the next beginner class but, ideally, she wouldn't be 33% of my class. So we're dealing with reality.

To help her catch up and as a great excuse to do something I've wanted to do for a while, I made a series of instructional sewing videos just covering the sewing-on-paper bit of the lesson. That filled up my memory card but now that I've dumped it all onto the computer I want to move on to the basics of threading the machine and sewing up the neato felt coasters. Once my molasses-speed internet connection uploads the videos to YouTube I'll put up links here so you can watch and relive your earliest sewing days. :)

Thanks for the encouragement, it's helped so much!

Thursday, June 19, 2008

Vacation and sewing fun

I'll be vacationing far away from the internet (and cable, and, just possibly, cell phone towers) for the next week so this blog will go into silence mode for that time.

To tide you over, here's some pics of what's I've been up to!


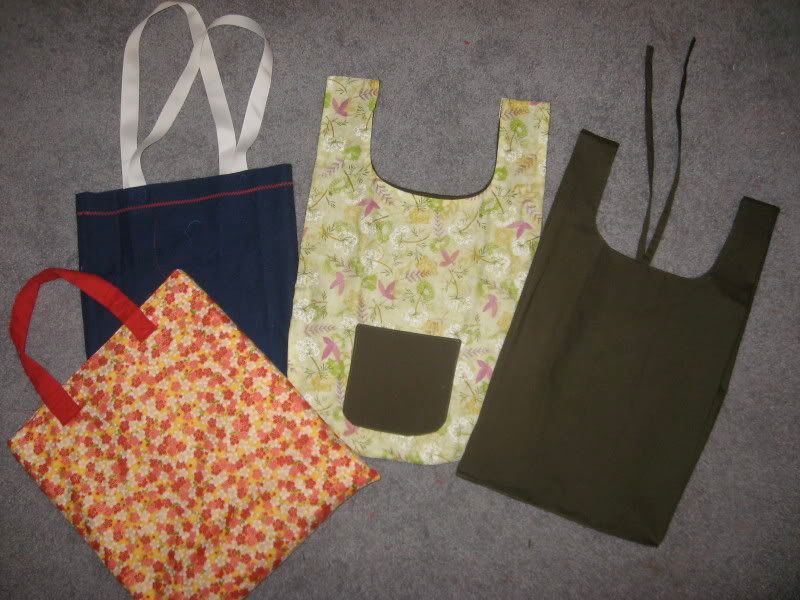
Some bags I've made. The far left one, the yellow and red one, is a padded laptop bag. The rest are green grocery bags. Lots of fun and very easy to make!


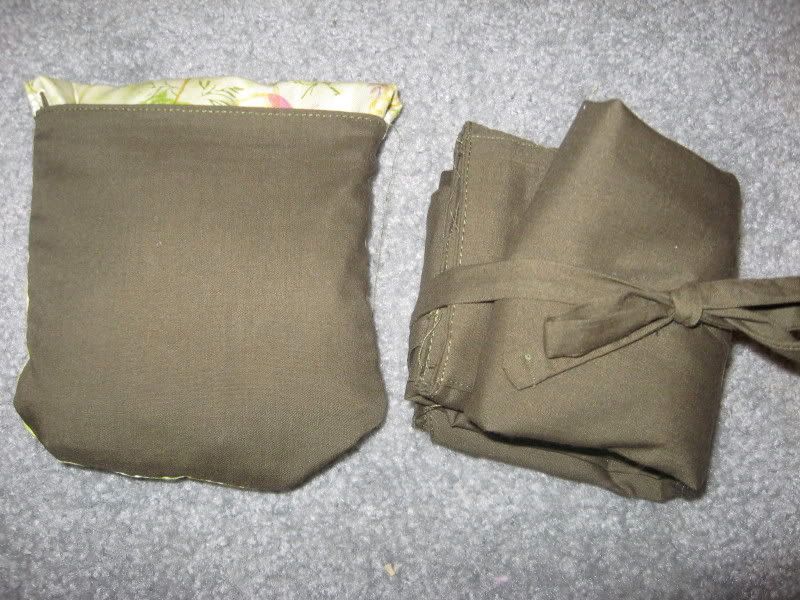
The two most green grocery bags ready for transport. The green flower one folds up into it's handy pouch while the solid green one rolls and gets tied up. I prefer the pouch personally but I wanted to experiment a bit.


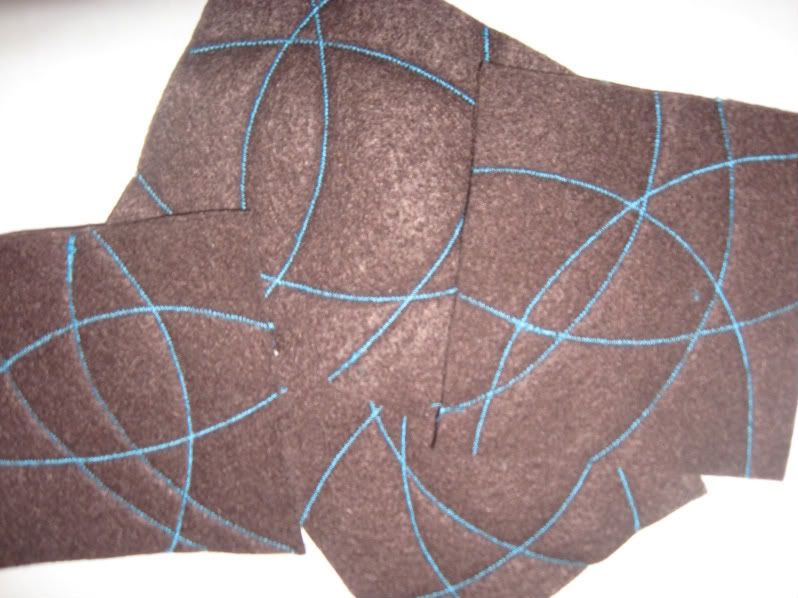
More coasters, this time in fuzzy mode! The lighting's bad right now so I'll have to make it up with better pictures later. The blue one is showing that the blue felt isn't inheritantly tacky, it's just tacky when I try to pair it with red and white, like the previous coasters. I wound up googling wedding colors and got a truck load of ideas of what colors actually look good with others. This blue with lime green coaster was a result. And the green lime thread is serious stash - it's on a wooden spool and cost 30c when new. I assume that was whenever this color was last in vogue. But it's still strong and it's not like any important seams are depending on it! The brown coasters were me FINALLY trying to sew on a beginner's level (I never was any good at that, even as a beginner. Which is why I have so many ... interesting ... things ... as relics of that time) and just doing straight lines across the felt. I really like how they look. They're best when the straight lines are done with a slight zig-zag stitch for definition but even at their most basic they're nice. Good to know!

And, in other news, I finally have a sewing class ready to start up! It'll begin a week after we get back. So much to do!

Tuesday, June 17, 2008

More felt coaster fun


I had fun today.  :)


The brown coasters with blue curves are based on these coasters. I drew the lines on tissue paper, using various round things in my kitchen as the templates and then stitched the design on a sandwich of tissue paper-felt-felt. Thread width set to 2, length at 1. The double layer of felt gives it a great quilted, puffy effect and the tissue paper kept the felt from getting stretched out - a problem I had with prior coasters.

Anyway, fun evening. Also started to teach DH how to sew ... but that's a story for another time. :)

Monday, June 16, 2008

Playing with my machine


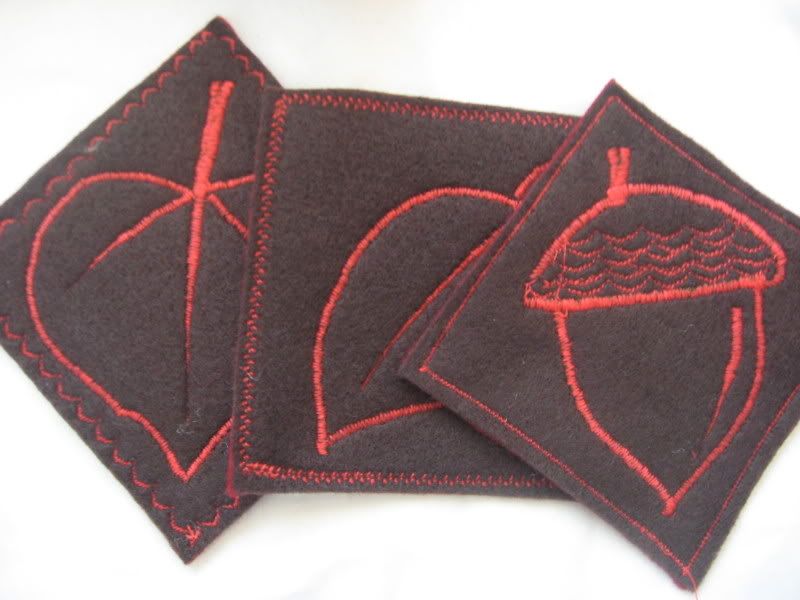
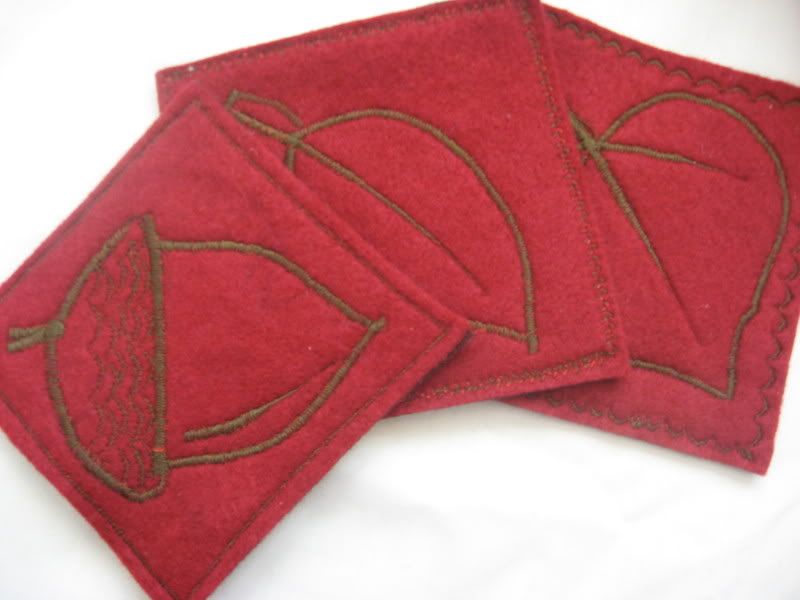
After years of avoiding any sort of embroidery on my machine, I decided to give it a go. I've been making up samples of projects for the sewing class I'm teaching (staring in just a few weeks!) and our first project will be simple little drink coasters made from felt. Theirs won't look like these - at least I don't expect them to.  We'll start with straight lines.  I made up a handful of samples with just the straight lines and I like them - but these are the ones that caught my camera's attention.  :)

These were made with two pieces of felt, one red, one brown.  I put brown thread in the bobbin, red in the needle, and then followed the pictures I'd sketched in the felt.  More or less - the marking pen didn't show up very well so a good amount of it was freehand.  The tapering lines you can see in each coaster were formed by sewing along as I narrowed the stitch width.  Somehow the combination of guiding the fabric with the left hand while turning a dial with my right made me feel so very coordinated.  It's a rare feeling for me so I enjoyed it!

I did the border last, though maybe I should have done it first.  Will try next time.  Anyway, the cheap felt tended to stretch and skew due to all the dense stitches so I finished off by sewing the borders then trimming off a good 1/4" from the edges.  Anyway, this was a fun little project that whipped up quickly.  Hm.  Wonder if I could make coasters for my aunt's birthday present?  Wonder what she'd like ... 

Tuesday, March 04, 2008

New Class to Suck My Time!


For my internship I have to teach at the lay school my seminary hosts. Makes sense. So I go in to interview for a position and the director asks what class I'd like to teach. I reach for the list of standard classes on his desk and he pulls it away and says, "no, not what class of our normal roster you'd like to teach, what class, if you could design one, would you like?" Well, it just so happens I'd been dreaming. So I describe this class looking at the New Testament cannon and the various criticisms it's come under recently from everything from the Gospel of Judas to Bart Eerhmans' questions about scribal corruptions and next thing I know I'm down to teach The New Testament Cannon: Do We Really Have God's Word? next semester. Over the next few months I need to get together either a textbook or selected readings, a schedule, and a syllabus for this brand new class. Eeep! And, at the same time, very, very exciting!

In other news there's no way I can teach that class, take 4 classes myself, and still put in the hours they need me at work. So something has to give and it looks like work is the one that will. Financially things work out if I just bring in a couple hundred a month and so I began thinking ... is this the year to finally do what I've been wanting to do and start teaching sewing classes? There's been a bit of a convergence of stars here with more people living near campus, a woman donating new sewing machines, an increase in interest among those I've talked to, and our apartment is just right for a class of 6 people and sewing machines. It's not spacious but, well, neither are the places that my students will be sewing in. First on the docket - get caught up with classes so I can dream without guilt! But after that I need to do test runs of the class projects, get tables for sewing on, rearrange the living room, advertise, and, I'm sure, so much more. But I'm excited and, after a string of jobs that have left me more worn out and discouraged than anything else, I don't mind a bit.